Back to Eureka Implant Finder™
Eureka Implant Finder™ Manual
INTENDED USE
The Eureka Implant Finder is a cutting-edge electronic device designed to accurately detect dental implants hidden beneath gum tissue. By utilizing advanced electromagnetic technology, this tool ensures precise localization during two-stage implantology procedures, optimizing efficiency and patient outcomes.
CONTRAINDICATIONS
This device is contraindicated for use in patients with active medical implants such as pacemakers, cochlear implants, or similar devices.
The safety and efficacy of this product have not been established for use in pregnant women or pediatric patients.
WARRANTY AND LIMITATION OF LIABILITY
IMPORTANT — READ CAREFULLY BEFORE USE
This product is intended strictly for professional dental use by trained and licensed healthcare providers. Conmetior warrants that the device is free from manufacturing defects in material and workmanship under normal use for a period of one (1) year from the date of purchase. This limited warranty applies only to the original purchaser and is not transferable.
Warranty Exclusions and Limitations
Conmetior shall not be held liable under any circumstances for the following, including but not limited to:
1. PATIENT INJURY OR DEATH
Under no condition shall Conmetior be liable for any injury, medical complication, or death of a patient resulting from the use, misuse, or malfunction of this device. Clinical risks and outcomes are the sole responsibility of the licensed practitioner using the device.
2. OPERATOR INJURY OR NEGLIGENCE
Any use of this device in a manner not expressly described in the instructions, including lack of attention, user error, or failure to follow accepted clinical protocols, voids all warranties and releases Conmetior from any and all liability.
3. ACCIDENTAL DAMAGE OR DROPPING THE DEVICE
This device is a precision instrument. Dropping the unit or any of its components — whether or not it appears to function afterward — voids the warranty. Damage caused by impact, mishandling, or improper storage is not covered and is the sole responsibility of the purchaser.
4. IMPROPER CLEANING & STERILIZATION
Damage caused by failure to follow sterilization guidelines, use of unapproved disinfectants, ultrasonic cleaners, or exposure to excessive heat or moisture will void the warranty.
5. USE BY UNQUALIFIED PERSONNEL
Use of the device by individuals who are not trained, licensed, or otherwise qualified to perform dental procedures absolves Conmetior of all liability.
6. UNAPPROVED OR OFF-LABEL USE
The device must only be used for the purposes explicitly stated in this manual. Any use beyond these indications is considered off-label and is undertaken entirely at the user’s own risk.
7. ELECTROMAGNETIC INTERFERENCE OR ENVIRONMENTAL FACTORS
Malfunction due to failure to follow electromagnetic compatibility (EMC) guidelines or recommended environmental/storage conditions is not covered under warranty.
8. INDIRECT, INCIDENTAL, OR CONSQUENTIAL DAMAGES
Conmetior shall not be liable for any indirect, incidental, special, or consequential damages, including but not limited to lost income, clinical delays, business interruption, or legal claims stemming from use of this device.
Legal Disclaimer of Responsibility
By purchasing, opening, or using this product, the purchaser/user explicitly agrees to all terms stated in this manual and acknowledges full responsibility for the safe handling and clinical use of the device.
The purchaser understands and accepts that:
This device is not guaranteed to prevent surgical or clinical complications.
All responsibility for patient safety rests with the licensed operator.
Conmetior is not liable for injury, death, or damage resulting from use of this product under any circumstance.
If you do not agree to these terms, return the unused product in its original packaging for a full refund.
Part Identification
Handle — 1pcs
Base — 1pcs
Sensor — 1pcs
Sensor holder — 1pcs
Adapter — 1pcs
Disposable sleeves — 50pcs

Technical Specifications
Electrical Classification:
Protection type: Class II
Protection degree: Type B
Battery:
Type: Rechargeable lithium-ion
Model: 14500
Capacity: 850 mAh
Safety Features: Over-voltage, over-current, and short-circuit protection
Adapter:
Input: 100–240V AC, 50/60 Hz
Output: 5V DC, 1A
Operation Modes: continuous operation
Operating Conditions
Intended Use Location: Enclosed clinical environments
Ambient Temperature: 5°C to 40°C
Relative Humidity: 10% to 80%
Atmospheric Pressure: 70–106 kPa
Transport and Storage Conditions
Temperature: -20°C to +55°C
Relative Humidity: 20% to 80%
Atmospheric Pressure: 70–106 kPa
User Interface
Main Switch to power the device
Display screen
Direction Button to change direction
S button to change speed
N button to change torque

Charging The Unit
Connect the power adapter to the charging port located at the bottom of the handle. Ensure the connection is secure before charging.

While the device is charging, the battery icon on the screen will display a sequence of orange symbols to indicate charging progress, as shown below:

Low Battery Indicator
When the battery power is low, the following icon will appear on the screen to alert the user.

A red ring will flash continuously.
A full charge typically takes up to four hours, depending on the remaining battery level and the battery's condition (state of health).
Once charging is complete, the battery icon on the screen will display as shown below:

⚠️ Warning
Initial Charging
Before first use, charge the device for at least 4 hours to ensure optimal battery performance.
Use Only Approved Components
Always use the original Conmetior adapter and battery supplied with the Eureka Implant Finder. Use of unauthorized components may result in malfunction or permanent damage and void the warranty.
Operation During Charging
The device cannot be used while charging. Ensure it is fully charged prior to clinical procedures.
Battery Life and Replacement
If you notice that the battery drains unusually quickly, this may indicate that the battery has reached the end of its usable life. Please contact Conmetior customer service to arrange a battery exchange. (Replacement fees may apply.)
Installing the Eureka
Plug the Sensor holder into the handle until it is securely seated. You will hear a loud “click”, indicating it is locked into place.
The sensor holder features a male connector, which fits precisely into the single slot interface of the handle. Once engaged, the sensor holder head can rotate 360 degrees, allowing for optimal positioning during use.

Powering On the Device
When the Eureka Implant Finder is powered on and ready for use, four green segments on the device will begin blinking.
Before each measurement, press the power button to initiate an automatic self-test and calibration. This ensures measurement accuracy and optimal device performance.
Make sure that no metallic object will be closer than 10 centimeters to the sensor.
Self-Test and Calibration
Before beginning operation, the device automatically performs a self-test followed by calibration to ensure accurate performance.
Self-Test Procedure
Upon powering on, the device initiates a self-check sequence.
If the sensor holder is not properly connected or the sensor is not fully inserted, an error will be indicated by a running red segment on the indicator.
After 10 seconds, if the issue is not corrected, the device will automatically shut down.
To resolve this error:
Turn off the device.
Ensure the sensor holder is securely connected.
Insert the sensor fully into the holder until it stops.
Turn the device back on.
Automatic Calibration
Following a successful self-test, the device begins automatic calibration.
During calibration, a running grid segment will appear.
Once the calibration is complete, all four segments will blink green, indicating the device is ready for use.

To restart calibration manually, press the power button again. This will initiate a new calibration cycle.
⚠️ Calibration Precautions
The presence of metallic objects near the sensor during self-test or calibration may interfere with device accuracy or cause malfunction.
If calibration fails:
Turn off the device.
Check the connection of the sensor holder and sensor.
If necessary, replace the sensor.
Ensure no metallic objects are within the sensor’s vicinity.
Power on the device again to repeat self-test and calibration.
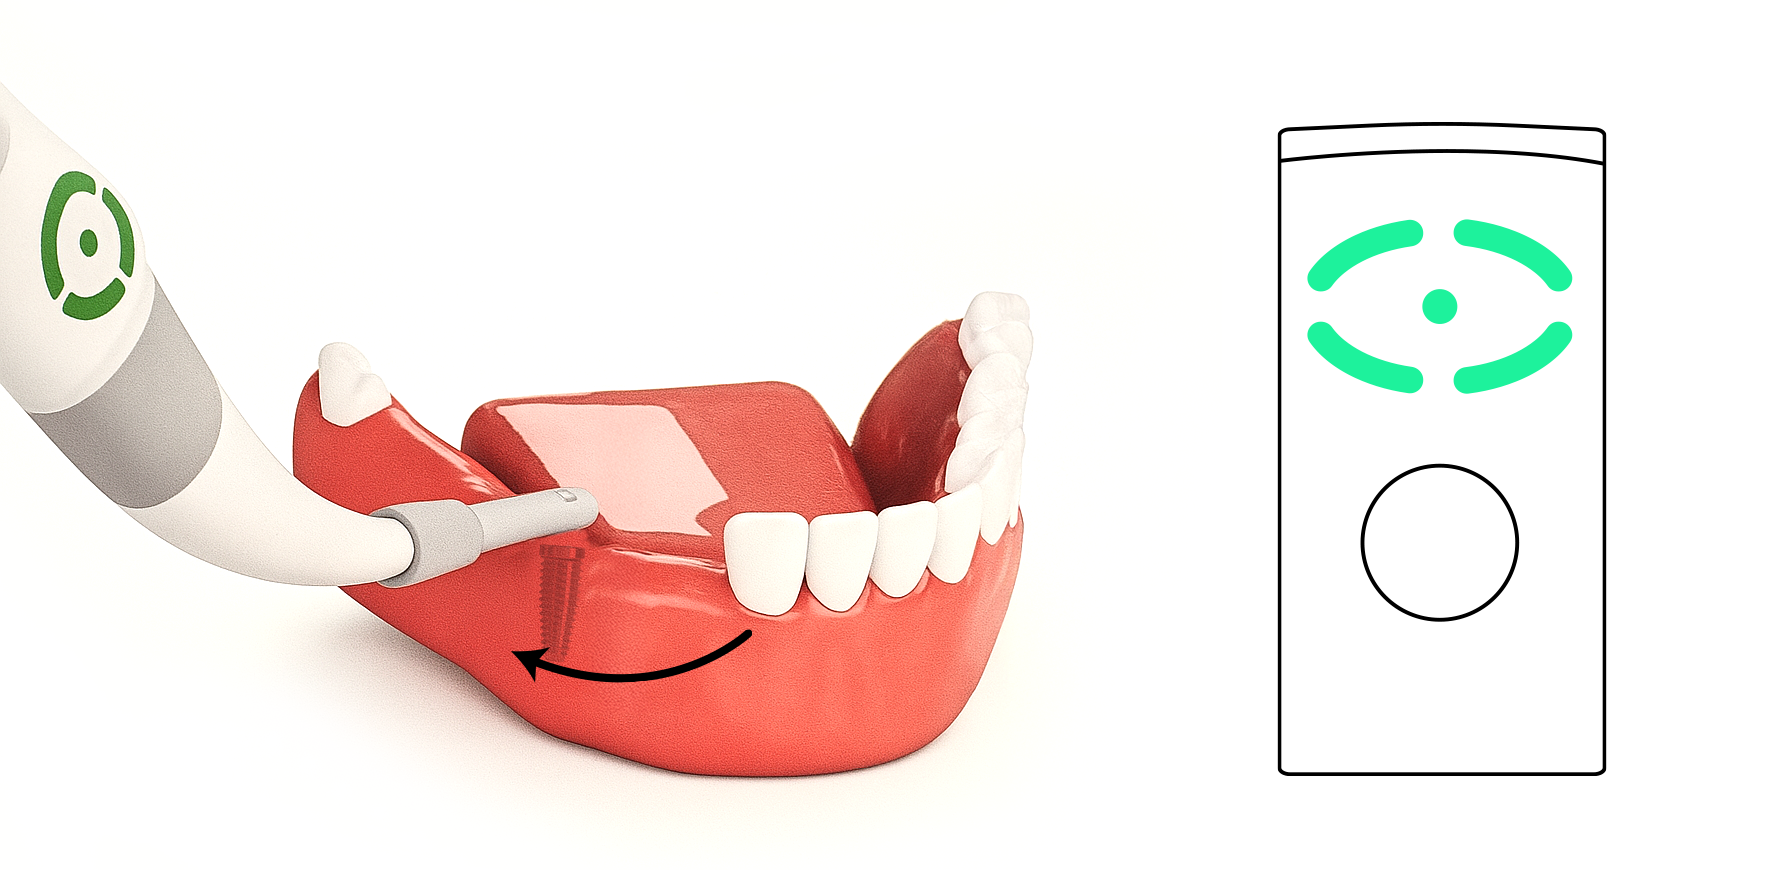
Locating the Implant
Insert the device into the oral cavity and place the sensor plane on the gum tissue, starting at a distance from the estimated implant location. The central hole of the sensor should be aligned roughly with the center of the alveolar ridge.
Slowly move the sensor along the jawline toward the expected implant position while maintaining light consistent pressure between the sensor and gum tissue. A slight but constant press ensures proper contact and accurate reading.
Avoid any gaps between the sensor plane and the soft tissue during scanning. Lack of contact may compromise detection accuracy.
Note: A thick gingival layer over the implant may reduce precision or prevent detection altogether.

Sensor Installation and Error Handling
If the device is powered on without the sensor properly attached, it will display a flashing red light to indicate an error.
In such a case, attach the sensor and then press the power button once to recalibrate the device before proceeding. Failure to recalibrate may result in inaccurate or failed detection.
Implant Localization Procedure
As the sensor approaches the implant, the four segments on the device will turn steady green.
Continue moving the sensor smoothly and without stopping in the same direction. When the sensor passes over the implant, the segments will turn orange, indicating that the implant position has been passed.
Reverse direction and slowly move the sensor back along the same path. The four segments will turn green again, confirming that the sensor is once again approaching the implant.
As the sensor returns precisely to the implant's position, the four segments will turn off, and the central dot will turn green, confirming successful implant detection.
A continual DI/DI audio signal will accompany this visual cue to reinforce confirmation of implant location.
Once the implant is detected, use the central hole in the sensor as a guide and mark the gum at that location using a dental probe.
Indicator: Green
Meaning:
The sensor is approaching the implant.
Action:
Continue moving the sensor in the same direction smoothly without stopping.
Indicator: Orange
Meaning:
The sensor has passed the implant position.
Action:
Reverse direction and continue moving smoothly along the same path to locate the implant.

Indicator: Green (on reverse path)
Meaning:
The sensor is moving back toward the implant position.
Action:
Continue in the reverse direction, maintaining a smooth, steady motion toward the implant.

Indicator: Green Central Dot
Meaning:
Implant location detected precisely.
Action:
Mark the implant site through the central hole in the sensor using a dental probe.

⚠️ Important Sensor Movement Guidelines
Maintain Smooth, Continuous Movement
The sensor must be moved smoothly and steadily during implant detection. Avoid stopping or reversing direction unnecessarily, as this may compromise the accuracy of the readings.Do Not Pause for More Than 3 Seconds
If the sensor is held still for more than 3 seconds before the implant is fully detected (i.e., before the central green dot turns on), the system will automatically reset and the four segments will begin blinking green.
In this case, the detection process must be restarted from the beginning.
Cross-Scanning Technique
To enhance the accuracy of implant localization, it is recommended to perform additional scanning in the buccal–lingual direction after the initial mesial–distal scan.
After the implant location has been detected and marked, remove the sensor and reposition it for a buccal–lingual scan, maintaining light pressure against the gum tissue.
The scanning technique is identical to the primary sequence previously described.

⚠️ Caution:
The presence of metal crowns, abutments, large amalgam restorations, or metal instruments in proximity to the implant may interfere with detection accuracy or prevent correct localization.
Localization of Multiple Implants
After successfully locating and marking the first implant, continue scanning along the ridge to estimate the position of the next implant.
As the sensor moves along the arch, the central dot will turn off and the four segments will turn orange, then begin to blink green, indicating the device is ready for a new implant detection cycle.
Perform implant localization using the same scanning method as described for the initial implant.
⚠️ Note:
Accurate localization may be difficult or impossible if two or more implants are placed too close together.
Automatic Shutdown
The Eureka Implant Finder will automatically shut down after one minute of inactivity to conserve battery life.
To manually power off the device after completing implant localization, press and hold the power button for approximately one second.
Maintenance & Sterilization
To ensure proper hygiene and patient safety, all components must be thoroughly cleaned, disinfected, and sterilized before the first use and after each subsequent use.
Important Guidelines
Follow national and local sterilization regulations.
Use only disinfectants approved for medical devices (VAH/DGHM listed, CE marked, FDA-approved).
Do not clean the Eureka in an ultrasonic cleaner.
Do not Auto-clave Eureka
Do not use bleach or chlorine-based disinfectants.
The user is solely responsible for ensuring sterility prior to each use. Always wear appropriate personal protective equipment (PPE) during handling and maintenance.
Autoclavable components
Warning
CLEANING AND DISINFECTING
1 Preparation
Disconnect the sensor from the sensor holder. Store instruments in a dry, clean environment — not in humid surroundings.
2 Transportation
Ensure safe and protective storage of all components during transport to avoid damage or contamination.
3 Pre-Decontamination
Disassemble the device completely prior to cleaning. Only disassembled parts should be reprocessed.
4 Manual Pre-Cleaning
Visually inspect and manually clean all components. Submerge only the sensor in cleaning solution and flush lumens with a cold-water jet for at least 10 seconds. Use a soft-bristle brush for external surfaces.
5 Automated Cleaning
The sensor is not intended for automated cleaning.
6 Disinfection
Soak the sensor in the disinfectant solution combine with proteolytic enzyme if possible.
Rinse well the sensor in flowing water.
7 Drying
No particular requirement.
8 Maintenance
Inspect all components for damage or wear. Clean and disinfect any visibly soiled parts again. Lubricate the contra-angle as instructed.
9 Packaging
Use approved sterilization packaging to prepare clean and dry parts for autoclaving.
10 Sterilization
Perform steam sterilization at 135°C (273.2F) for 18 minutes in gravity type auto-clave. (tabletop, N type). Allow 10 minutes minimum drying time post-cycle.
11 Storage
Store components in their sterilization packaging in a dry, clean, and dust-free environment until next use.
Use only FDA-cleared steam sterilizers (autoclaves) that are properly maintained and validated for use with dental instruments.
Before initial use and after every procedure, all sterilizable components must undergo steam sterilization.
Allow all components to cool completely before handling.
Before use, inspect the sterilization packaging to ensure it is intact, dry, and within its expiration date.
If the packaging is damaged, wet, or expired, the components must be repackaged and sterilized again.
Note: Disinfection alone is not sufficient. Steam sterilization is required before the first use and after every use.
Disinfection of other components
Disinfection of External Surfaces
Wipe all external surfaces using a lint-free cloth lightly moistened with ethanol (70–80% by volume).
Surfaces must remain visibly wet for at least 2 minutes.
Repeat the wiping process five times to ensure effective disinfection.
Important: Only ethanol should be used for surface disinfection. Do not use other disinfectants, sprays, or chemical wipes, as they will damage the device.
Battery Maintenance
Charge the battery when the battery icon flashes on the display.
If the device is not used for an extended period, charge it fully at least once per month to prevent deep discharge and maintain battery health.
Troubleshooting
Refer to the troubleshooting section for common issues and their solutions. If problems persist, do not attempt repair. Contact Conmetior for authorized support.
| Issue | Possible Cause | Solution |
|---|---|---|
| The device does not turn on by pressing power button | Electronic malfunction | Contact your customer service. |
| Sensor is subject to external interference | There's a metal body interference near the sensor, which affects the detection and positioning accuracy | Press the power button once, restart automatic self-test and calibration. Avoid interference objects before using the device again. |
| Eureka does not respond and light flash red | The battery power is too low | Charge the battery. |
| Device is not able to locate implant | Sensor is disconnected | Damage to the sensor, sensor coating or sensor contacts | Sensor holder is damaged bad contact | Electronic malfunction | Turn the device off, remove the sensor, clean the contact surfaces of the sensor and reinsert it. Turn the device on again. Replace the sensor. Replace your sensor holder. Contact customer service. |
Battery Maintenance
Charge the battery when the battery icon flashes on the display.
If the device is not used for an extended period, charge it fully at least once per month to prevent deep discharge and maintain battery health.
Symbols

Environmental Disposal
Packaging materials: Recyclable
Metal components: Dispose as scrap metal
Electrical parts and PCBs: Dispose as electronic waste
Lithium batteries: Treat as hazardous waste per local laws
Manufacturer Rights
Conmetior reserves the right to modify product specifications, design, and documentation without prior notice.
Images included in this manual are for reference only.
All product designs, including internal architecture and aesthetic form, are protected by patent and intellectual property laws. Unauthorized reproduction or imitation is strictly prohibited.